The knowledge points about surface roughness can be obtained from this paper
1、 Concept of surface roughness
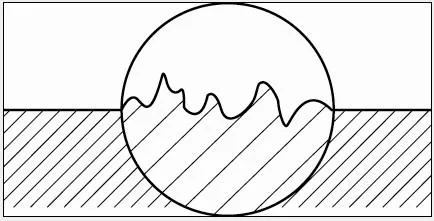
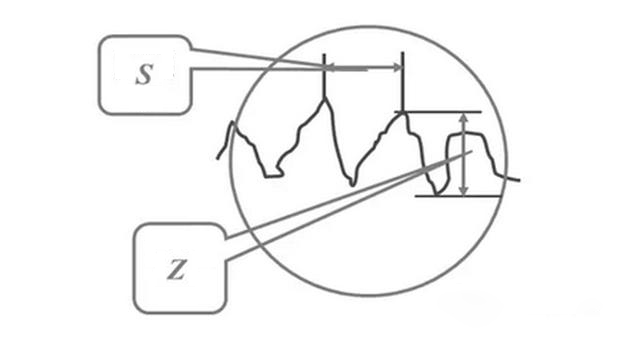
Surface roughness refers to the roughness of the machined surface with small spacing and small peaks and valleys. The distance (wave distance) between two wave peaks or two wave valleys is very small (below 1mm), which belongs to micro geometric error. Specifically, it refers to the height and spacing (s) of micro peak and valley (z). Generally, it is divided according to s: s < 1mm is the surface roughness; 1 ≤ s ≤ 10mm refers to waviness; S > 10mm is F shape.
2、 Comparison table of vdi3400, RA and Rmax
The national standard stipulates that two indexes are commonly used to evaluate the surface roughness: the average arithmetic deviation Ra of the contour and the maximum height deviation RZ of the contour, with the unit of μ m。
RA index is widely used in domestic actual production; Rmax index commonly used in Japan, equivalent to RZ index; Vdi3400 standard is commonly used to mark the surface roughness in European and American countries, and the ch standard of Shamir pattern is equivalent to vdi3400 standard. The following is the comparison table of vdi3400, RA and Rmax.
3、 Formation factors of surface roughness
The surface roughness is generally formed by the machining method and other factors, such as the friction between the tool and the part surface in the machining process, the plastic deformation of the surface layer metal when the chip is separated, the high-frequency vibration in the process system, the discharge pit of EDM, etc. Due to the different processing methods and workpiece materials, the depth, density, shape and texture of the marks left on the machined surface are different.
4、 The influence of surface roughness on parts is mainly shown as follows:
1. Affect wear resistance. The coarser the surface, the smaller the effective contact area between mating surfaces, the greater the pressure, the greater the friction resistance, and the faster the wear.
2. Affect the stability of coordination. For clearance fit, the coarser the surface is, the easier it is to wear, which gradually increases the intermediate clearance in the working process; For the interference fit, the actual effective interference is reduced and the connection strength is reduced due to the flattening of the micro convex peak during assembly.
3. Affect fatigue strength. There are large wave troughs on the surface of rough parts. They are as sensitive to stress concentration as sharp corners, notches and cracks, which affect the fatigue strength of parts.
4. Affect corrosion resistance. The rough surface of parts is easy to make corrosive gas or liquid penetrate into the inner layer of metal through the micro valleys on the surface, resulting in surface corrosion.
5. Affect the tightness. Rough surfaces cannot fit tightly, and gas or liquid leaks through the gap between the contact surfaces.
6. Affect the contact stiffness. Contact stiffness is the ability of the joint surface of parts to resist contact deformation under the action of external force. The stiffness of the machine largely depends on the contact stiffness between the parts.
7. Affect the measurement accuracy. The surface roughness of the measured surface of parts and the measuring surface of measuring tools will directly affect the measurement accuracy, especially in precision measurement.
In addition, the surface roughness will have different effects on the plating coating, thermal conductivity and contact resistance, reflection and radiation performance, resistance of liquid and gas flow, current flow on the conductor surface, etc.
5、 Evaluation basis of surface roughness
1. Sampling length
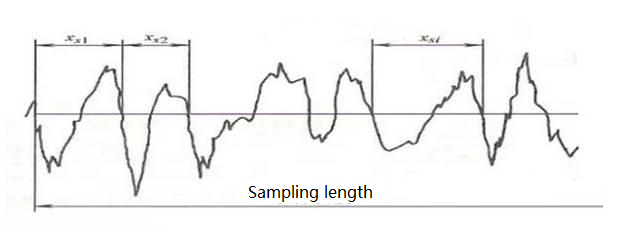
The sampling length is the length of a reference line specified for evaluating surface roughness. The length that can reflect the characteristics of surface roughness shall be selected according to the formation and texture characteristics of the actual surface of the part. The sampling length shall be measured according to the general trend of the actual surface contour. The sampling length is specified and selected to limit and weaken the influence of surface waviness and shape error on the measurement results of surface roughness.
2. Evaluation length
The evaluation length is a necessary length for evaluating the contour, which can include one or several sampling lengths. Because the surface roughness of each part of the part surface is not necessarily very uniform, one sampling length often can not reasonably reflect the characteristics of a certain surface roughness, so it is necessary to take several sampling lengths on the surface to evaluate the surface roughness. The evaluation length generally includes 5 sampling lengths.
3. Datum line
The datum line is the contour center line used to evaluate the surface roughness parameters. There are two kinds of datum lines: the least square centerline of the contour: within the sampling length, the sum of the squares of the contour offset of each point on the contour line is the smallest, which has a geometric contour shape. Arithmetic mean centerline of contour: within the sampling length, the areas of the contours on the upper and lower sides of the centerline are equal. In theory, the least square midline is an ideal datum line, but it is difficult to obtain in practical application. Therefore, it is generally replaced by the arithmetic mean midline of the contour, and can be replaced by a straight line with approximate position during measurement.
6、 Surface roughness evaluation parameters
1. Height characteristic parameters
1) Arithmetical mean deviation of the contour length (LR) within the arithmetic mean of the contour. In actual measurement, the more the number of measuring points, the more accurate RA is.

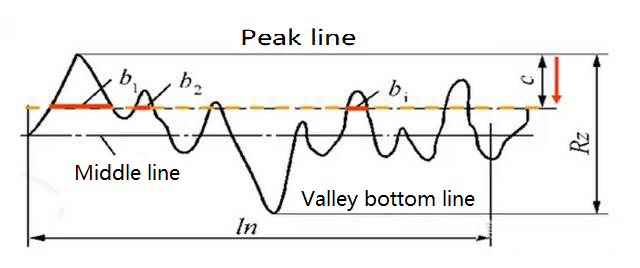
2) Maximum contour height RZ: the distance between the contour peak line and the bottom line.
RA is preferred in the common range of amplitude parameters. Before 2006, another evaluation parameter in the national standard was “ten point height of micro unevenness” expressed by RZ and the maximum height of contour expressed by ry. after 2006, the ten point height of micro unevenness was cancelled in the national standard and RZ was used to represent the maximum height of contour.
2. Spacing characteristic parameters
3) It is expressed by the average width RSM of the contour unit. The average value of the contour micro unevenness spacing within the sampling length. The micro unevenness spacing refers to the length of the contour peak and the adjacent contour Valley on the midline. When the Ra value is the same, the RSM value is not necessarily the same, so the reflected texture will be different. The surface paying attention to the texture usually pays attention to the two indicators of RA and RSM.

4) The shape characteristic parameters are expressed by the contour support length ratio RMR, which is the ratio of the contour support length to the sampling length. The length of contour support is the sum of the length of each section obtained by cutting the contour with a straight line parallel to the center line and C away from the contour peak line within the sampling length.
7、 Surface roughness measurement method
1. Comparative method
It is used for on-site measurement in the workshop and is often used for the measurement of medium or rough surfaces. The method is to compare the measured surface with the roughness template marked with a certain value to determine the roughness value of the measured surface.
2. Needling method
The surface roughness uses a diamond stylus with a radius of curvature of about 2 microns to slide slowly along the measured surface. The up and down displacement of the diamond stylus is converted into an electrical signal by an electrical length sensor. After amplification, filtering and calculation, the surface roughness value is indicated by the display instrument, and the measured section profile curve can also be recorded by a recorder. Generally, the measuring tool that can only display the surface roughness value is called the surface roughness measuring instrument, and the one that can record the surface contour curve is called the surface roughness profiler. Both measuring tools have electronic calculation circuit or computer, which can automatically calculate the arithmetic mean deviation Ra of contour, the height RZ of ten points of micro unevenness, the maximum height ry of contour and many other evaluation parameters. They have high measurement efficiency and are suitable for measuring the surface roughness with RA of 0.025 ~ 6.3 microns.

