Optimization scheme for efficient machining of aerospace aluminum alloy thin-walled parts (I): Machining system optimization
At present, China’s aerospace products have gradually entered the period of high-density launch, and the manufacturing demand of various aerospace products is increasing year by year, forcing aerospace manufacturing enterprises to significantly increase their production capacity.
At present, the most commonly used Aerospace typical parts are high-strength aluminum alloy materials (such as 2A12), which are free cutting plastic materials with low strength and hardness, low melting point, good thermal conductivity and low tensile strength. Although high-strength aluminum alloy has good machinability, because the structural parts of aerospace products have the characteristics of complex shape and structure, large amount of material removal and easy deformation of thin wall, and have higher requirements for parts processing accuracy, quality and processing efficiency, the aerospace manufacturing industry has also continued to study the efficient cutting of high-strength aluminum alloy. High efficiency machining is a new process combining high-speed machining technology and cutting process optimization. It is the key technology to solve the complex integral structural parts of aerospace. High efficiency machining technology is characterized by high material removal rate and short single piece machining time in the machining process, and the machining accuracy and surface quality are guaranteed through the optimization of cutting parameters.
1、 Machining system optimization
Compared with ordinary machining, high-speed and efficient machining has higher requirements for the whole machining system. In the NC milling process of aerospace integral structural parts, in order to ensure the machining quality and machining accuracy of parts and improve the material removal rate in the machining process, the cutting system composed of machine tool tool workpiece and their interfaces (tool handle and fixture) must be systematically optimized to ensure the stability and reliability of the whole system in the process of high-speed cutting.
1. Machine tool
The requirements of high-speed machining on machine tools mainly include the following aspects:
(1) The machine tool structure should have excellent static, dynamic and thermal characteristics;
(2) The spindle unit can provide high speed, high power and high torque;
(3) The feed unit can provide large feed speed.
If necessary, the dynamic performance parameters of the milling system can be obtained through the modal analysis test of the cutting system, which provides corresponding basic data for solving the milling dynamic model and predicting the machining stability.
2. Knife handle
For the selection of high-speed machining tools and tool holders, the safety of use should be considered first, otherwise the spindle of the machine tool will be damaged and even safety accidents will occur. The selection requirements of cutting tools and tool holders for high-speed machining mainly include the following aspects.
(1) The allowable speed of the tool must be greater than or equal to the actual machining speed.
(2) High speed machining tools and tool handles must meet the requirements of dynamic balance and radial runout, generally reaching G6 3 or G2 5 above requirements.
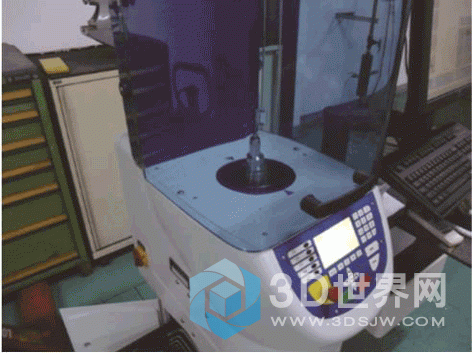
Through the dynamic balance test (see Figure 1), the hydraulic tool handle and tool, and the powerful dynamic balance tool handle and tool can reach G2 5, and the spring collet tool handle and tool can reach G6 3, but it can not meet the requirements of G2 5. Dynamic balance accuracy requirements.
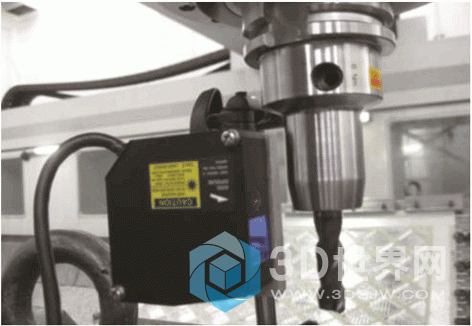
When measuring the maximum radial displacement runout of the powerful dynamic balance tool handle, spring collet tool handle and hydraulic tool handle (see Figure 2), it is found that the powerful dynamic balance tool handle has the minimum radial runout (see Figure 3).
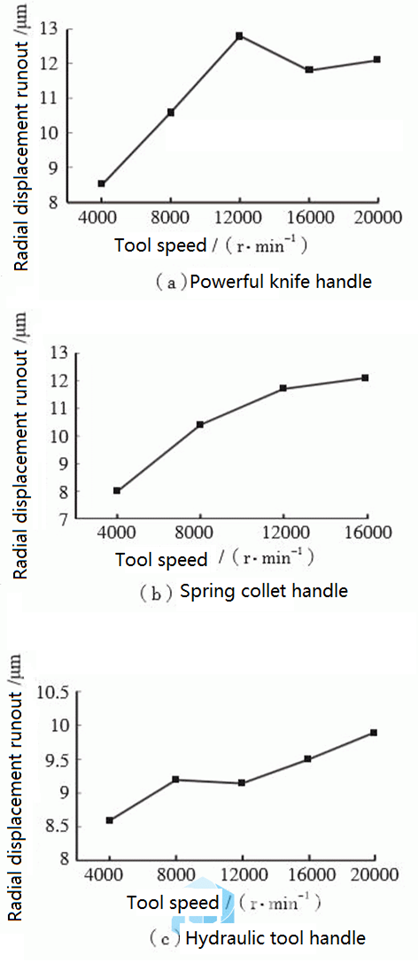
From the radial displacement runout measurement test, it can be seen that under the condition of tool speed of 20000 R / min, the dynamic balance mass is selected, and the accuracy reaches G2 5-grade powerful tool and handle. After radial displacement runout detection, when the spindle speed of the machine tool reaches 20000 R / min, the maximum radial displacement runout of the tool is 10.95 ~ 12.05 μ m. Meet the requirements of tool radial jump in high-speed precision machining.
(3) In high-speed machining, the tool handle is required to have higher clamping force.
Figure 4 shows the comparison of the maximum torque that can be achieved by the hydraulic tool handle, powerful tool handle and heat shrinkable tool handle commonly used in HSK series. It can be seen from the figure that the maximum torque that can be achieved by using the ordinary spring collet er32 is only 196N · m, the maximum torque that can be achieved by using the hydraulic tool handle hydro32 is 441n · m, and the maximum torque that can be achieved by using the heat shrinkable tool handle is 784n · m, which is the same as the maximum torque that can be achieved by the powerful tool handle maxin20.
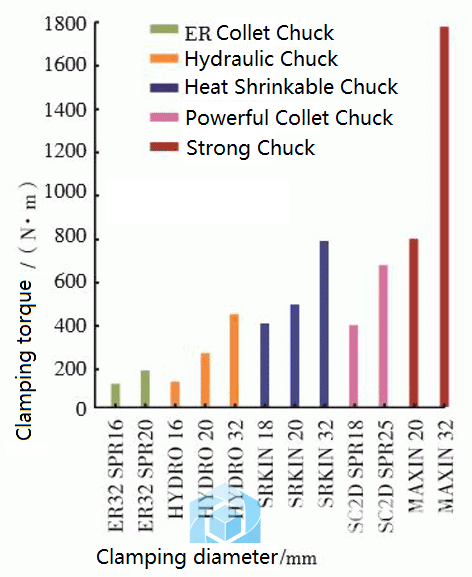
To sum up, the powerful dynamic balance tool handle has high dynamic balance accuracy and small diameter runout, which is suitable for high-speed and high-precision machining. In addition, the use of heat shrinkable tool handle can also obtain higher dynamic balance accuracy, lower tool handle weight and higher tool clamping force.
3. Clamping system
The special tooling for efficient machining should not only ensure the effective clamping and positioning during high-speed cutting, but also consider the convenience of realizing rapid positioning and clamping. Its design points mainly include the following aspects.
(1) The positioning contact area between the tooling and the workpiece shall be as large as possible. At the same time, the plane (or curved surface) as large as possible shall be selected on the workpiece as the positioning surface, and the machining accuracy requirements of the positioning surface shall be improved to ensure that the positioning surface of the workpiece and the datum plane of the fixture fit naturally and closely and increase the contact stiffness.
(2) Over positioning is often used for thin-walled parts with poor rigidity, especially at the weak rigidity, support should be added to improve the process stiffness of the workpiece.
(3) On the premise of ensuring reliable clamping, the clamping force shall be as small and evenly distributed as possible, and the number of clamping points and the action area of clamping force shall be appropriately increased. Apply clamping force in the direction with good rigidity of the part and act on the surface with good rigidity.
At present, the clamping fixtures commonly used in manufacturing industry mainly include mechanical type, hydraulic adjustable type, vacuum adsorption type, pneumatic type, etc. Compared with traditional manual mechanical clamping fixtures, hydraulic, vacuum adsorption and pneumatic clamping fixtures have the characteristics of automation, high clamping efficiency and controllable clamping force, which are more suitable for efficient processing.
The clamping force of vacuum adsorption fixture is small (its unit pressure does not exceed one atmospheric pressure, i.e. less than 105Pa), but it is evenly distributed. It is suitable for clamping any object with smooth surface, especially the small allowance removal processing such as finishing, grinding and polishing of weakly rigid large thin shell workpieces that are not suitable for clamping. However, the vacuum adsorption fixture has high requirements for the surface roughness and contour dimension of the workpiece in contact with the fixture.
The hydraulic adjustable fixture can realize the real-time adjustable and controllable attitude and state of the clamping element, and ensure the continuity of the cutting path of the tool; In addition, some components of the fixture can be changed or replaced to change the fixture structure, so as to meet the processing and clamping requirements of different parts, which has wider applicability.
The pneumatic fixture can realize the function of the hydraulic fixture and achieve enough compression force. Different from the hydraulic fixture, the pneumatic fixture uses air pressure as the power source.

