Are you right about machining accuracy?
As we all know, machining accuracy refers to the compliance between the actual size, shape and position of the machined part surface and the ideal geometric parameters required by the drawing. Therefore, when we need precision machining, our first response is to find a precision machining equipment, and our inventory of precision machining equipment comes from parameters. In fact, for the definition of this precision, the standards of each country are different.
Let’s take a rigorous look at those things about accuracy!
Accuracy: refers to the closeness between the measured result and the true value. High measurement accuracy means that the systematic error is small. At this time, the average value of the measured data deviates less from the true value, but the data is scattered, that is, the size of the accidental error is not clear.
Precision: refers to the reproducibility and consistency between the results obtained by repeated determination with the same spare sample. It is possible that the precision is high, but the accuracy is inaccurate. For example, the three results obtained by measuring the length of 1mm are 1.051mm, 1.053 and 1.052 respectively. Although their precision is high, they are inaccurate.

Accuracy indicates the correctness of measurement results, precision indicates the repeatability and reproducibility of measurement results, and precision is the prerequisite of accuracy.
In a promotional article on CNC machine tools, the “positioning accuracy” of machine tool a is marked as 0.004mm, while on the sample of another manufacturer, the “positioning accuracy” of similar machine tool B is marked as 0.006mm. From these data, you will naturally think that the accuracy of machine tool a is higher than that of machine tool B.
However, in fact, it is likely that the accuracy of machine tool B is higher than that of machine tool a. the problem is how to define the accuracy of machine tool a and B respectively. Therefore, when we talk about the “accuracy” of CNC machine tools, we must clarify the definition and calculation method of standards and indicators.
1、 Definition of precision:
Generally speaking, accuracy refers to the ability of the machine tool to locate the tool tip point to the program target point. However, there are many ways to measure this positioning ability. More importantly, different countries have different regulations.
Japanese machine tool manufacturers: jisb6201 or jisb6336 or jisb6338 standards are usually used when calibrating “accuracy”. Jisb6201 is generally used for general machine tools and general CNC machine tools, jisb6336 is generally used for machining centers, and jisb6338 is generally used for vertical machining centers.
European machine tool manufacturers, especially German manufacturers, generally adopt VDI / dgq3441 standard.
American machine tool manufacturers: nmtba (national machine tool builder’s Assn) standard is usually adopted (this standard comes from a study of American machine tool manufacturing association, which was promulgated in 1968 and later modified).
When calibrating the accuracy of a CNC machine tool, it is very necessary to mark the standards used together. Using JIS standard, the data is obviously smaller than using nmtba standard of the United States or VDI standard of Germany.
The same indicators have different meanings
What is often confused is that the same index name represents different meanings in different accuracy standards, but different index names have the same meaning. The above four standards, except JIS standards, are calculated through mathematical statistics after multiple rounds of measurement of multi-target points on the NC axis of the machine tool. The key differences are as follows:
1. Number of target points
2. Measure rounds
3. Approach the target point from one-way or two-way (this point is particularly important)
4. Calculation method of accuracy index and other indexes
This is the key difference description of the four standards. As people expect, one day, all machine tool manufacturers will uniformly follow the ISO standard. Therefore, the ISO standard is selected here as the benchmark. The four standards are compared in the following table. This paper only involves linear accuracy, because the calculation principle of rotation accuracy is basically the same.
2、 Effect of temperature on accuracy: thermal stability
Steel: 100 x 30 x 20 mm
Change of size when the temperature drops from 25 ℃ to 20 ℃: at 25 ℃, the size is too large 6 μ m. When the temperature drops to 20 ℃, the size is only 0.12 larger μ m. This is a thermally stable process. Even if the temperature drops rapidly, it still needs a continuous time to maintain the accuracy. The larger the object, the more time it takes to restore accuracy and stability when the temperature changes.
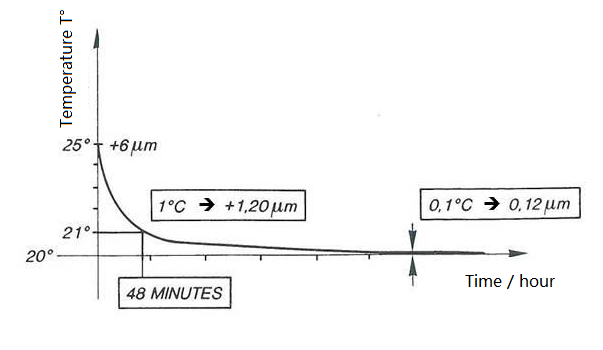
It is very important to maintain the machining accuracy of the temperature table. If the machining accuracy is very high, it is recommended that the temperature can not be changed with care!

